
|
Commenced:
|
01/09/2015 |
|---|---|
|
Submitted:
|
05/10/2015 |
|
Last updated:
|
05/03/2017 |
|
Location:
|
329 Old Canobolas Road, Nashdale via Orange, NSW, AU |
|
Phone:
|
0428601801 |
|
Website:
|
http://www.habitat-vineyard.com.au |
|
Climate zone:
|
Cool Temperate |
(projects i'm involved in)
Project: Habitat Vineyard
Posted by Zoe McGrath over 10 years ago
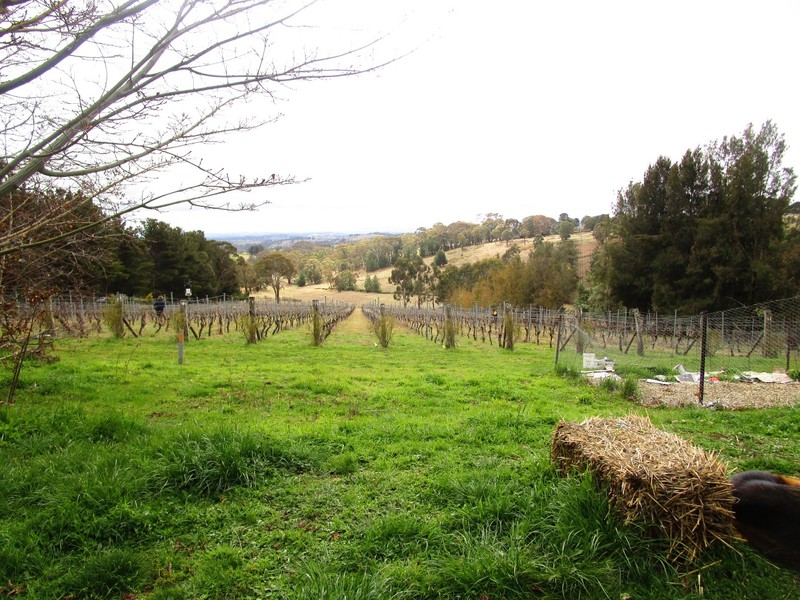
Before Shot: A front lawn with a slope and zero productivity
Our mission: Create a zone 1 keyhole garden on contour that the animals can't wreak havoc on. Oh and don't block the view.
The original, rough plan:
To begin, we broke up the lawn with the digger on the tractor and laid out logs in order to gain a visual on where to establish the terraces.
As the propery is on a 45 degree slope, levelling was integral. We used the lazer leveller to map out the contours using the cement surface outside the house as a datum point (If you look closely at the centre of the photo you can see the datum point circled).
We then laid out string to see where (at this point) appeared to be the ideal place for keyholes and pathways.
The next step was to remove the obstacles and terrace the slope using the tractor and bucket attachment.
The chooks were very pleased with the newly dug up soil and got to work immediately. We put the logs back in place which would act as a barrier for the bottom terrace walls. The space between the top and middle layer was left as a slope in order to create more surface area to host perennials.
After thoroughly digging up and levelling out the terraces with mattocks and shovels, we were left with the basic layout of the garden.
A thin layer of trace elements (a previous soil analysis of the property indicated which nutrients were lacking) were spinkled over the the ground. The chooks then assisted us in spreading an even layer of woodchip from the cold compost, the microorganisms from which would additionally work to balance out the added trace elements.
Rather than digging up the top layer, we smothered the grass with whatever scrap paper/cardboard we had available and then covered it further with the cold compost and water. Straw was loosely scattered on the top of this and wet further.
An electric fence was placed around the garden in order to prevent the various animals from doing damage, with a gate stationed at the front door for the most convenient access.
Prior to the execution of the garden, we planted seedlings into soil blocks comprised of worm castings, soil from the property, compost, sand and bentonite clay (kitty litter).
The seedlings flourished in the nursery and thanks to the success of the soil blocks, they experienced no transplant shock when planted into the ground.
The peas were planted on the bottom layer and a trellis system was put in place by crossing over whatever sticks we had available (first with steel stakes, followed by bamboo and hazelnut branches).
Of course, the original plan was altered throughout the establishment of the garden as more appropriate techniques presented themselves. For example: the keyhole idea was scrapped for rows of trellising on the bottom terrace and a winding pathway in the middle.
Surrounding the winding pathway, the rest of the seedlings were planted along with seeds scattered along the slope to prevent erosion. The intention behind planting perennials is that their roots will grow deep into the soil and also create shade across the garden and therefore require less watering.
We extended the irrigation system by installing a new tap at the top of the garden. Although this consisted of almost an entire day spent digging a trench for the pipe, the inital extra input of energy resulted in very little amounts of energy spent from thereon.
A sprinkler was attached to the newly installed tap and voila! Now all that's left to do is wait patiently for everything to grow and harvest delicious food from our doorstep.
You must be logged in to comment.


Note: The various badges displayed in people profiles are largely honesty-based self-proclamations by the individuals themselves. There are reporting functions users can use if they know of blatant misrepresentation (for both people and projects). Legitimacy, competency and reputation for all people and projects can be evidenced and/or developed through their providing regular updates on permaculture work they’re involved in, before/after photographs, etc. A spirit of objective nurturing of both people and projects through knowledge/encouragement/inspiration/resource sharing is the aim of the Worldwide Permaculture Network.
 |
MemberA member is a permaculturist who has never taken a PDC course. These cannot become PDC teachers. Members may be novice or highly experienced permaculturists or anywhere in between. Watch their updates for evaluation. |
|---|---|
  |
Permaculture MatchmakerOne of these badges will show if you select your gender and the "I'm single, looking for a permaculture partner" option in your profile. |
 |
PDCPeople who claim to have taken a Permaculture Design Certificate (PDC) course somewhere in the world. |
 |
PDC VerifiedPeople who have entered an email address for the teacher of their PDC course, and have had their PDC status verified by that teacher. Watch their updates for evaluation. |
 |
PRI PDCPeople who’ve taken a Permaculture Research Institute PDC somewhere in the world. |
 |
PDC TeacherPeople who claim to teach some version of PDC somewhere in the world. |
 |
PRI TeacherWith the exception of the ‘Member’ who has never taken a PDC, all of the above can apply to become a PRI PDC Teacher. PRI PDC Teachers are those who the PRI recognise, through a vetting board, as determined and competent to teach the full 72-hour course as developed by Permaculture founder Bill Mollison – covering all the topics of The Designers’ Manual as well as possible (i.e. not cherry picking only aspects the teacher feels most interested or competent in). Such teachers also commit to focussing on the design science, and not including subjective spiritual/metaphysical elements. The reason these items are not included in the PDC curriculum is because they are “belief” based. Permaculture Design education concerns itself with teaching good design based on strategies and techniques which are scientifically provable. PRI PDC Teachers may be given teaching and/or consultancy offerings as they become available as the network grows. |
 |
Aid WorkerThe individual with this badge is indicating they are, have, or would like to be involved in permaculture aid work. As such, the individual may or may not have permaculture aid worker experience. Watch their updates for evaluation. |
 |
ConsultantThe individual with this badge is indicating they are, have, or would like to do paid permaculture design consultancy work. As such, the individual may or may not have permaculture consultancy experience. Watch their updates for evaluation. |
 |
Community ProjectCommunity projects are projects that help develop sustainable community interaction and increase localised resiliency. |

