
|
Commenced:
|
01/08/2007 |
|---|---|
|
Submitted:
|
15/02/2011 |
|
Last updated:
|
23/10/2015 |
|
Location:
|
PO Box 14, Karat Konso, SNNPRS, ET |
|
Phone:
|
+251 912 21 46 87 |
|
Website:
|
www.permalodge.org |
|
Climate zone:
|
Dry Tropical |
(projects i'm involved in)
Back to Strawberry Fields Eco Lodge
Project: Strawberry Fields Eco Lodge
Posted by Abdur-Rahman McCausland over 13 years ago
As most of us know, grey water is a term used to refer to “waste” water that has been used once in any domestic system except for toilets (which is referred to as black water). However grey water from the kitchen may be considered as “dark grey” water on account of the fact that it tends to contain a lot more fats and protein from the grease and grime that comes off pots and pans than say shower outflow water which is quite dilute. If you let kitchen grey water sit around it quickly goes rancid and doesn’t smell a lot different from sewage. The grey water coming out of our kitchen also has some pretty nasty detergents in it (Ajax) and we can’t really get hold of anything more eco out here in Ethiopia. Initially we tried putting this grey water directly into an infiltration pit, but that didn’t work very well as it tended to fill up and start to reek and kill the surrounding plants, especially in the rain season.
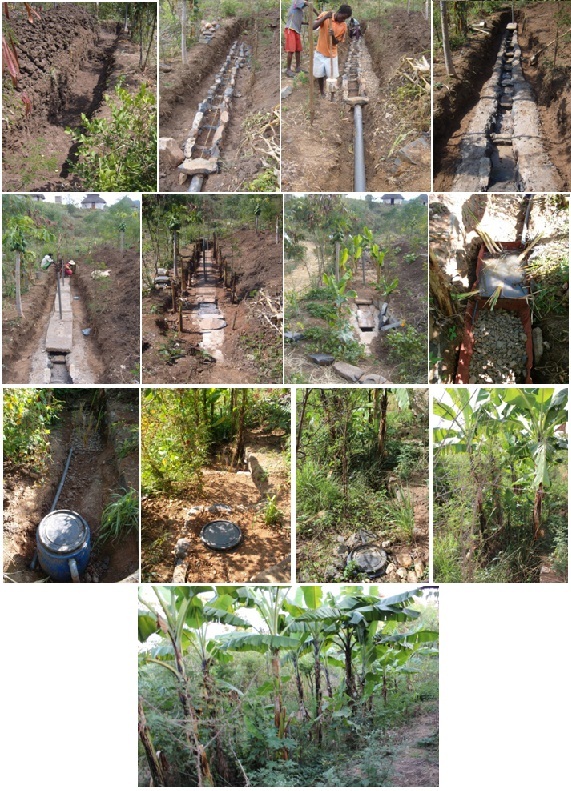
Then we dug a 12m long soak-away with an aeration cascade, under-ground, which we did a write up about on this blog back in (October 2010). The soak-away worked fine to begin with. We used a fine mesh sieve at the entrance to the system in order to sieve out solids. We soon began to realise that this sieve was catching large amounts of material which was putrefying there, and also blocking the water flow necessitating regular removal, which was not a nice job. It would also begin to block up the soak-away itself if not removed regularly, and since we have problems with staff not always “remembering” to do things like that, we needed a systems more capable of running itself. So we decided to add a sceptic tank upstream of the soak-away.
Sceptic tanks work by trapping and anaerobically digesting the solid material in the discharge until it either breaks down into dissolved material or won’t break down any more. The tank comprises two compartments with a baffle wall in between them. There is a gap in the wall 50cm down from the water surface level. Any non-dissolved solid material in the water which is less dense than the water itself will float so can’t get through this gap, and is trapped at the surface as a scum. Any material denser than water will sediment to the bottom and is trapped as sludge, so can’t get through the gap either. All that can get through the gap is dissolved materials or the few materials which may happen to be exactly the density of water and hence remain suspended in mid stream, which are very few materials. The sceptic tank is an anaerobic environment and hosts a resident population of bacteria which continuously decompose the sludge and the scum materials, breaking them down into gasses, which exit through the air vents/piping, and soluble aqueous bi-products, which exit in the liquid discharge. Some solids will build up over the course of several years as un-digestible sludge. This may need occasional removal as it takes up volume in the tank - It can be composted.
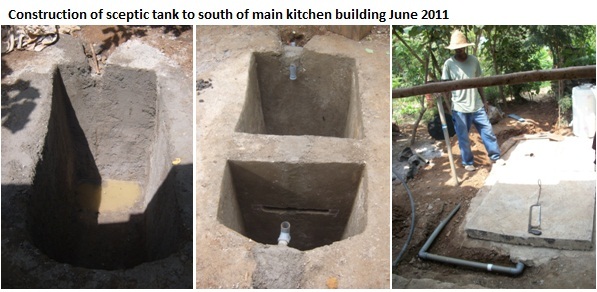
We put in our tank in June 2011. We designed our tank using the criteria from a handy little book called “Water Treatment and Sanitation: Simple Methods for Rural Areas” (by H.T. Mann and D. Williamson) According to these guys, you can calculate what dimensions to make a sceptic tank according to the following criteria:
Volume = daily water consumption [avg. personal use x no of users] + sludge storage volume [no of users x 150 litres] (but should not be less than 1500 litres total - this assumes an average retention time of 24 hours for the liquid passing through the tank)
Sludge volume is assumed to be 150 litres per user for a toilet system. However, since our system is not a toilet (black water) system this criterion in inappropriate to our case. Since our total kitchen water usage is not more than 500liters per day anyway, so we went with the minimum volume of 1500 litres.
The floor of the tank should slope downwards from the outflow end to the inflow end with a gradient of 1 in 10 and a minimum depth of 1.5m.
The tank comprises a large compartment, which is the inflow compartment, which is 2/3rds of the total volume and a small, outflow, compartment which is 1/3rd of the total volume. Between the compartments is a baffle wall which has a horizontal aperture of 5cm width running across it at 50cm below the surface of the water level.
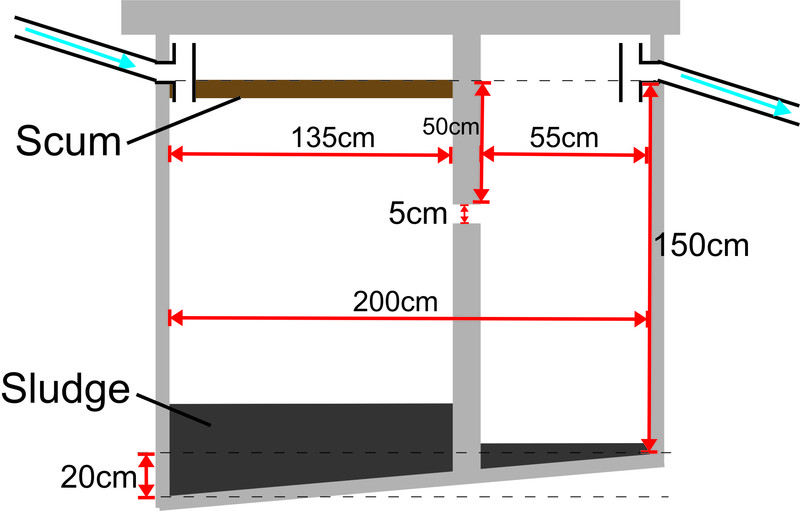
We decided to fix the length of the tank at 2m, which worked well with the space we had. With a shallow end depth of 150cm and a floor at a slope of 1:10, that meant a fall of 20cm to the deep end. That gives an average depth of 160cm for the entire length of the tank. 1.6m deep x 2m long gives a cross section area of 3.2m2. 1500 litres is 1.5m3, so to get a volume of 1.5m3, we need to calculate the width, which is the volume divided by the cross section = 1.5/3.2 = 0.46m. So we decided to make it 50cm wide for good measure. The dividing wall is of 10cm thickness, so we assumed the extra 4cm to the width of the tank would compensate for this. The wall was placed at 135cm from the inflow end and 55cm from the outflow end.
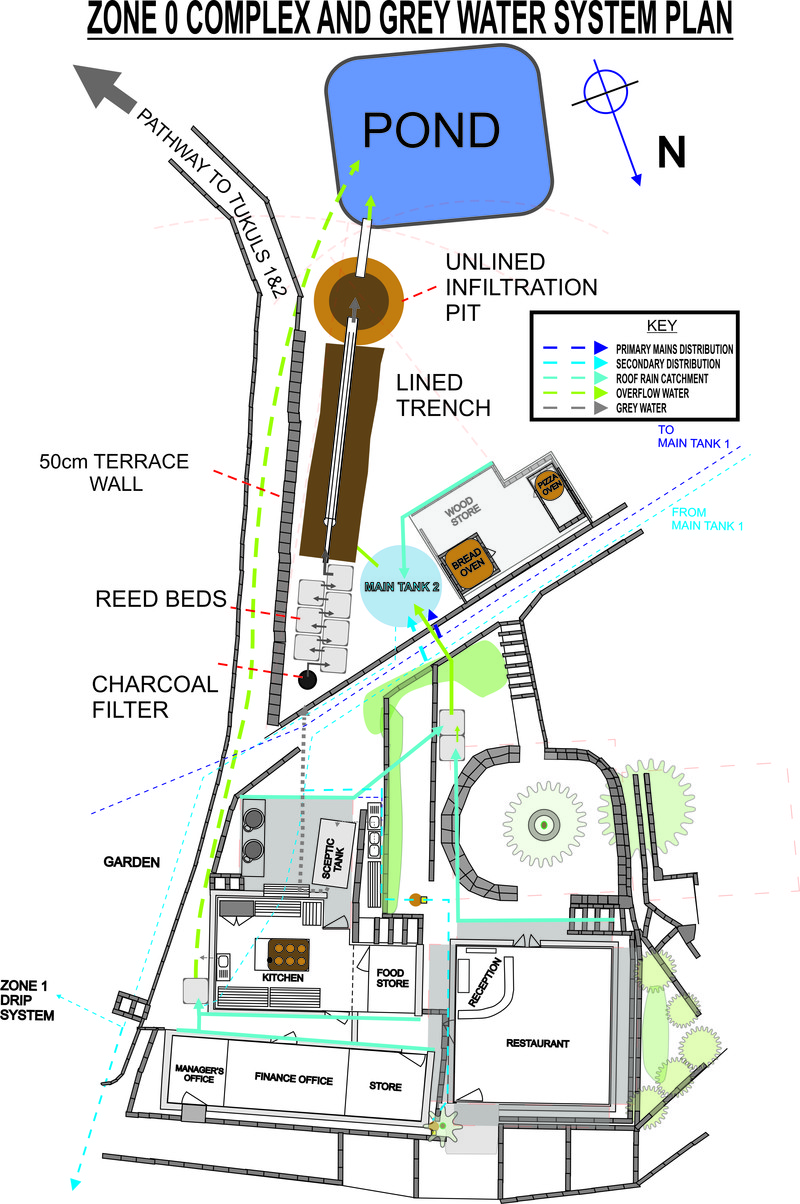
The sceptic tank has been working fine now for a year and a half without any problems there has subsequently been almost zero solid material entering the soak-away. However we have been somewhat concerned that it is not removing all the potentially harmful chemicals in the washing detergents we use in the kitchen, so we have added two intermediate “prototype” treatment systems in between the sceptic tank and the soak away – a charcoal filter and a reed-bed. These have worked OK, but we now want to upgrade the whole system to improve the effectiveness of water cleansing, nutrient re-capture and also get some re-capture of the treated grey water as actual clean water which can be directed for irrigation purposes.
Concerning the intermediate systems, firstly we added a charcoal filter, which is basically a barrel full of charcoal with an inflow at the top and outflow at the bottom (you can see it up there at the bottom of the first figure). Charcoal is an excellent absorber of toxins. We change the charcoal very few months and burn the used charcoal.
Then we made the reed-bed by slicing a 200 litre drum in half lengthways and laying the two halves down in the ground, connecting them together, filling them with gravel and planting various different reed species into them which we were able to get from local lakes and wetland areas. This was the first reed-bed we’ve done so it was quite experimental, just to see what worked really. We tried a number of reed species but the only one that managed to survive, take hold and eventually thrive was a Juncus species.
The discharge from the reed-bed now goes into the soak-away. However, despite the different treatments this water has been through before reaching the soak-away it can still hardly be described as clean. It is black and has a pungent eggy smell to it. The smell may be attributed to sulphurous compounds produced in the anaerobic environment of the sceptic tank and reed bed. These will gas off in the aeration cascade as the effluent becomes aerobic. There are currently ten or so banana trees feeding on the outflow along the edges of the soak away. However their growth rate and production is not really as great as it might be considering the volume of water passing out of the system. Hence we want to improve the system to give better cleansing of the water before the soak away.
According to Geoff Lawton, a standard reed-bed should have a retention time of 7 days. With our upper estimate for water usage of 500 litres, that means se should have a capacity of 3500 litres for our reed-bed. With the current capacity of 200 litres we are way under on retention time! Hence we need to make a bigger reed bed for starters...
The New Reed-Bed System Design
The cheapest per-litre water holding containers here are the cubic 1000 litre jobbys that come in a cage, which are used to transport aeroplane fuel and other chemicals around the place by the big construction companies. These are nice, because they are fairly robust and versatile. You can stack them up and join them together or cut them in half as you please. So if we get 4 of these we can slice them in half and we have 8 containers of 500 litres with an open top, which are 50cm deep, also the right depth for a reed-bed, according to Geoff.
A reed-bed is an anaerobic system, like the sceptic tank. The container(s) hold(s) gravel medium, through which the effluent moves. The gravel provides physical anchorage for the growth of the reeds. Reeds are, like all higher plants (and animals) aerobic organisms, but ones which have developed the means exploit the boundary between aerobic (above ground/water) and anaerobic (swamp) environments. The way they do this is by transporting oxygen from the air down to their roots, so they often have air passages or spongy material in their stems and roots to allow this. As a result they tend to float on water, so need anchorage to stop them floating away. This will usually be mud in the natural system, but we provide this for them in the form of gravel. 20mm works best.
What will happen is that the reeds put out roots which inter-penetrate the spaces between the gravel particles and fill it with a dense net of roots and root-hair cells. These root hair cells comprise an exchange surface, by which the reeds exchange substances with the surrounding liquid. The reeds take in nutrients and expel their waste products. As well as this, the surface of the gravel particles and the roots themselves provide a surface area for bacterial films to form which further metabolise, break down and re-constitute the compounds in the liquid solution around them. This tends to break down the detergents and other chemicals into their constituent organic molecules, which are more readily accessible and usable by plants. The reeds suck these up and turn them into organic material which can be used on composting, construction or as animal fodder. E.G. soaps may be broken into fatty acids and phosphates, both of which are potentially useful to plants or the other organisms in the medium for growth. Furthermore, although the reed bed is an anaerobic medium, the upper part may have more available oxygen than the lower part, due to being at the surface. Hence different species of bacteria and other micro organisms will proliferate here. Different reed species may also have different zones of exploitation in the medium profile, as well as, as we know already, different levels of tolerance for chemicals passing through the system. More tolerant species will therefore do better upstream in the system and start to cleanse the water for less tolerant downstream species. Diversity is important.
Now in a reed-bed system we want to have a good continuous flow through all parts of the medium. It’s not just a question of in here and out there – we need the whole mass of the water to be on the move through all parts of the bed, so that each unit of water gets passed through each microhabitat within the system. It also means we don’t get some places where the water tends to hang around for ages and others where it tends to nip through more swiftly and hence get less time in the system. To insure this in our system we are going to use horizontal baffles, partially dividing the containers up into sections, but not quite, thus:
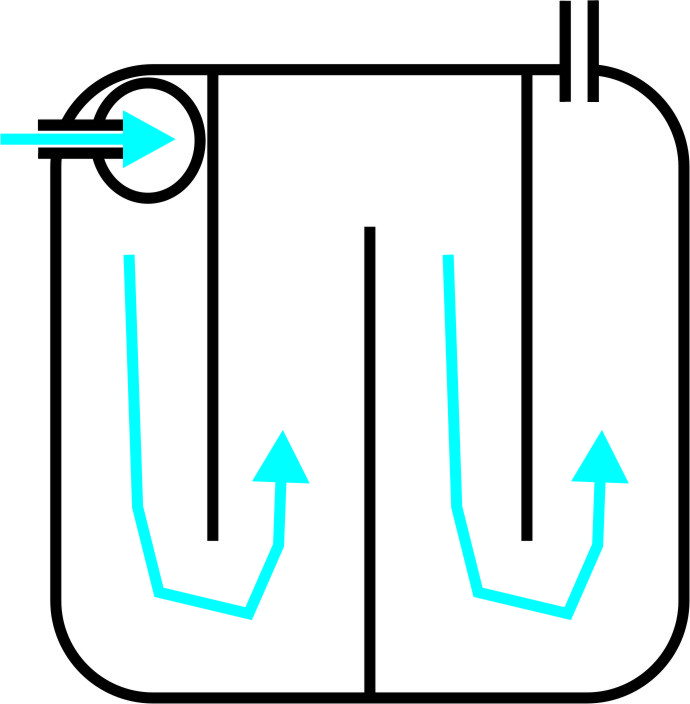
What we want to achieve with this is to get every part of the liquid to go through every part of the bed. So we will also put vertical cross baffles, to push the flow up and down. This will also make the total flow path longer. Seven half tanks will be connected together in the system to give us our total volume of 3500 litres as such:

The connector pipes are designed to take fluid out from all levels of the medium in one tank and deliver it to all the levels of the medium in the next tank. They also insure the connections are not blocked up by the reed’s root network. Two vertical sections of 100mm PVC pipe are set in the medium. These are perforated along their length. They have no gravel inside them. The perforations must be smaller than the gravel size - we use a larger grade of gravel (stones) (eg ~50mm) around the in-out flow pipes to prevent pebbles from getting on or blocking up the holes. The two vertical pipe sections are connected at the top through the walls of the two tanks by a section of smaller 50mm PVC pipe.
Design Up-Grade for the Aeration Cascade/Infiltration Trench
The current soak-away trench has worked OK for the 2 years since it was established. It has got rid of our waste water and grown a few bananas, without any blockage or foul liquid coming out of it. However we are sure we can do better. In re-designing the system we aim to get:
A) Better direct production of clean, healthy food from it.
B) Clean water with the potential for re-use in other systems on the project.
At the moment all of the water going into the system is infiltrated into the ground. Probably only a percentage of it is used by the bananas growing in the system, and then due to the system’s not-exactly-amazing quality of function, some residual salts and compounds may be inhibiting their growth. What we want here is an aerobic system. The previous systems upstream of this were all anaerobic. They will function to kill and break down all the aerobic pathogens and pests which may be in the water – e.g. worms eggs, seeds etc. – as well as the compounds such as soaps, detergents etc. and to physically filter and clean the water of all suspended particles. However now we want to aerate the water to remove the bi-products of anaerobic processes which may be harmful to aerobic organisms, such as H2S, CH4, NH3 etc. and we want to use it to grow aerobic organisms. To do this we make an aeration cascade.
We have designed a simple cascade as follows:
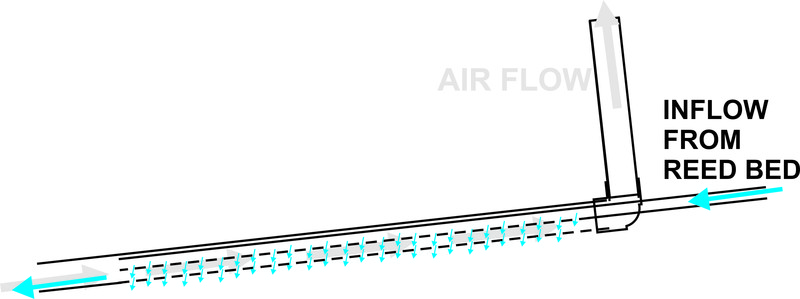
A small pipe (50mm PVC) is slotted at regular intervals. It is set within a larger pipe (100mm PVC) the larger pipe is also slotted. The water entering from the top of the small pipe runs along it dripping out through the slots. It drips down into the larger pipe. It is split into multiple small streams which are aerated by the air passing through the large pipe. The large pipe has an elbow and chimney at the upper end which tends to draw air in from the bottom, due to both breeze passing over the mouth of the chimney and due to warming of the air in the chimney, which is above ground, creating a convection current up-draft. From the larger pipe, which is also slotted, the now aerated water can seep out into the surrounding medium.
The idea behind this system design is to make sure that the water gets maximum use before percolating into the ground. In the dry season, however, when water at the surface tends to be lost rapidly by evaporation, any excess water should be allowed to percolate. In the rain season though, when the ground becomes saturated, excess water will be diverted into a lined pond, which can be pumped to a larger reservoir for to be used irrigation (refer to earlier articles published on out bulk plans for bulk water harvesting and irrigation).

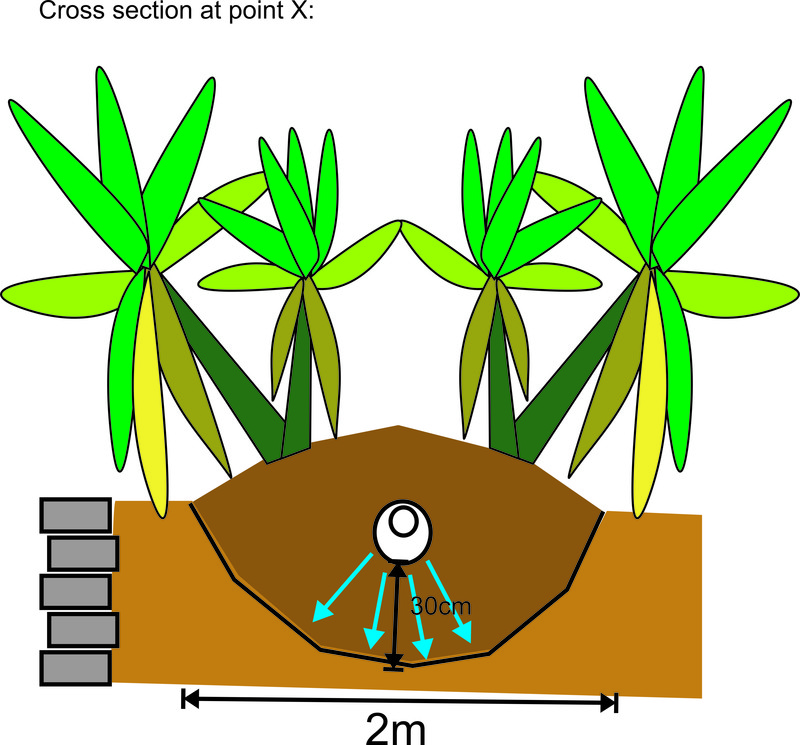
Therefore a 10m trench with a slight incline – of 1:20 will be dug and lined with pond liner. This will be filled with compost and mulch. The slotted pipe aerator will be laid down in this pit 30cm above the pond liner. Bananas will then be planted into the compost/mulch. These bananas will put their roots out under the slotted pipes and fill the medium with a root network, a bit like an aerobic version of the reed-bed. The water will have to pass through this network before reaching the pond liner. Then it will have to run along the liner down to the bottom of the trench. Here it will run into an un-lined infiltration pit, also planted up with bananas, papaya and sugar cane. The idea here is that it will percolate when the ground is dry. But in the rainy season the ground will become saturated and this pit will tend to fill up becoming a small pond.
The water entering it from the grey water system should now be clean enough to divert back into the water system (all be it for irrigation and not showers or kitchen use!), so as it fills up it will overflow into the lined pond in gulley 1. From here we can pump it up to our large reservoir in the upper gulley. You can find out about that system design in our previous report. Note that rain water falling from above onto the system will also be diverted through the infiltration pit, so an additional function of the system is to act as an additional rainwater harvesting surface!
We are planning to start implementing this system and many others during our upcoming 4-week group internship program at Strawberry Fields Eco Lodge from April 15th – May 11th right after our April PDC. If you would like to learn practically about how to set up systems like this come along and give us a hand! Hope to see you there...


You must be logged in to comment.


Note: The various badges displayed in people profiles are largely honesty-based self-proclamations by the individuals themselves. There are reporting functions users can use if they know of blatant misrepresentation (for both people and projects). Legitimacy, competency and reputation for all people and projects can be evidenced and/or developed through their providing regular updates on permaculture work they’re involved in, before/after photographs, etc. A spirit of objective nurturing of both people and projects through knowledge/encouragement/inspiration/resource sharing is the aim of the Worldwide Permaculture Network.
 |
MemberA member is a permaculturist who has never taken a PDC course. These cannot become PDC teachers. Members may be novice or highly experienced permaculturists or anywhere in between. Watch their updates for evaluation. |
|---|---|
  |
Permaculture MatchmakerOne of these badges will show if you select your gender and the "I'm single, looking for a permaculture partner" option in your profile. |
 |
PDCPeople who claim to have taken a Permaculture Design Certificate (PDC) course somewhere in the world. |
 |
PDC VerifiedPeople who have entered an email address for the teacher of their PDC course, and have had their PDC status verified by that teacher. Watch their updates for evaluation. |
 |
PRI PDCPeople who’ve taken a Permaculture Research Institute PDC somewhere in the world. |
 |
PDC TeacherPeople who claim to teach some version of PDC somewhere in the world. |
 |
PRI TeacherWith the exception of the ‘Member’ who has never taken a PDC, all of the above can apply to become a PRI PDC Teacher. PRI PDC Teachers are those who the PRI recognise, through a vetting board, as determined and competent to teach the full 72-hour course as developed by Permaculture founder Bill Mollison – covering all the topics of The Designers’ Manual as well as possible (i.e. not cherry picking only aspects the teacher feels most interested or competent in). Such teachers also commit to focussing on the design science, and not including subjective spiritual/metaphysical elements. The reason these items are not included in the PDC curriculum is because they are “belief” based. Permaculture Design education concerns itself with teaching good design based on strategies and techniques which are scientifically provable. PRI PDC Teachers may be given teaching and/or consultancy offerings as they become available as the network grows. |
 |
Aid WorkerThe individual with this badge is indicating they are, have, or would like to be involved in permaculture aid work. As such, the individual may or may not have permaculture aid worker experience. Watch their updates for evaluation. |
 |
ConsultantThe individual with this badge is indicating they are, have, or would like to do paid permaculture design consultancy work. As such, the individual may or may not have permaculture consultancy experience. Watch their updates for evaluation. |
 |
Community ProjectCommunity projects are projects that help develop sustainable community interaction and increase localised resiliency. |

